Fake a graph!
Use http://nces.ed.gov/nceskids/createagraph/default.aspx?ID=f132839312fa483da5701072d851594e
And type in your info. Download a PDF. Design it pretty in AE or Illustrator. And done.
Wednesday, July 2, 2014
Tuesday, November 12, 2013
MOV to WMV....ugh
Flip4Mac: awful translation of gradients and lights, no custom settings for the Standard edition. Pro (where you can increase the bitrate) is a hefty $160
Aimersoft Video Converter: free edition comes with a watermark. Used a high bitrate but still looks awful.
Wondershare: watermarked, but good quality.
MPG streamclip: uses Flip 4 Mac, awful at default, $160 to upgrade.
MacX Video Converter Free Edition: keeps crashing
MPG converter: won't do larger dimensions
Tune4MAc: fails
WinXMOV converter: crashes
http://video.online-convert.com/convert-to-wmv just as bad as Flip4Mac
PCHand MediaConverterPro: unregistered version converts up to 3 minutes
In conclusion, when you're on a Mac and you have to convert MOV to WMV your best bet is Flip 4 Mac. (Or to kick it old-school and find a Mac with Cleaner installed that always did a nice job for us in ye olde times...)
How to Terminal Render in AE
0. In AE, if you want to render more than 1 window in the Terminal, in AEP render settings, make sure "render multiple frames simultaneously" checkbox is on. If you're going out to ProRes in the end, render 16-bit Tiffs (change in Render Settings) that are set to Trillions (change Millions to Trillions in Output Module window). ProRes is 10-bit so it'll dumb down your 16-bit Tiffs. Set output of these tiffs to a folder on a drive that has TONS of space (can be 40MB per frame)
1. Cmd-space in your Finder
2. type "terminal"
3. open terminal, copy-paste the text: /Applications/Adobe\ After\ Effects\ CS5/aerender -project
(yes, with the space at the end of the line of text, also attached as TextEdit doc)
4. drag-drop your project file from Finder to land at end of text.
5. Then make another Terminal window (Cmd N) and repeat steps 3 & 4.
6. When render is over, import folder as Sequence, set framerate, and output your QT.
Tuesday, May 7, 2013
Color separation in Photoshop
How to separate an image so you can do trippy color-separation effects to it.
Before After


1-Click on your Layer window.
2-Make a new layer, name it Red.

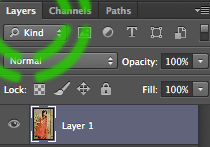
3-Locate the Channels Tab (usually under Layers) or go to Window/Channels to bring it up.

4-In the Channels window, click on Red. The other eyeballs should be off.

5-You’ll see a black-and-white representation of your image. White is where that color is fully present, Black is for absence of that color, grey is for in-between values of semi-Redness.
6-Cmd-click the Red thumbnail to load it as a selection.
7-Back to Layer window.
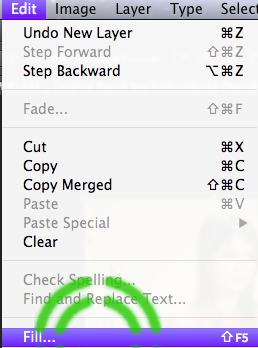
8-Edit/Fill. Use Color, and make red value 255.
9-Red is 255 as below.

10-Turn off eyeball on Red layer.
11-Repeat steps 2-9 for Blue and Green
12-Turn on your Red Green Blue layer eyeballs again. Turn off your original layer eyeball.
Image should look creepy as in the below.


13-Make a new layer, fill it Black. Image continues to look creepy.


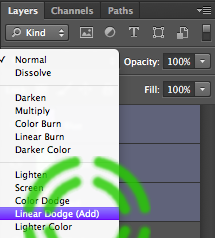
14-Select your color layers. Set their blending mode from Normal to Linear Dodge (Add).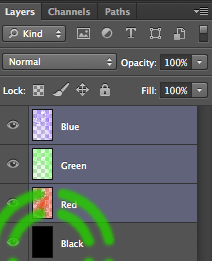
15-Image back to normal...Or is it?
Saturday, June 23, 2012
Compositing notes/tutorials
Here are the links I used at work today:
http://library.creativecow.net/articles/devis_andrew/AE_Lite-Bite_Light-Wrap-Effect/video-tutorial
http://provideocoalition.com/index.php/ryoung/story/how_to_light_wrap/
They have a series called Lite Bites, which are small AE snippets.
And the Mocha manual, from the Mocha AE that comes with CS5: QuickStart p. 39 has amazing tracking info for corner-pin tracking a screen onto a cellphone. So Good.
Thursday, June 7, 2012
AE Error messages
Top reasons for AE error messages:
-Too much unnecessary stuff in your comp (select your main comp and do a File/Reduce Project)
-Comps that are too big
-Comps that have a different framerate from each other.
In your Project window, you can expand its view by hovering your mouse over it and pressing ~ (Tilde) located under the Esc key.
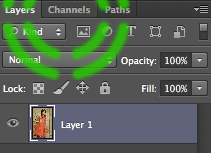
Then sort by Kind.
Open all your folders (yes, even the subfolders), starting at the bottom. Click thru your comps and see their framerate and dimensions in the little thumbnail viewer.

Shows name of comp
Dimensions Wide by Dimensions tall
Duration, framerate
To change the framerate or size, hit Cmd K. Try reducing a massive size by half (in Comp Settings, click the "Lock aspect ratio"

and then at the end of the first number (width) type /2 to divide in half).

Then go into the comp it lived in originally (click the twirly next to the name of comp in Proj window and double the scale value.

Click the scale values in that Timeline, and at the end, hit *2 and AE will do the math.
Brilliant!
-Too much unnecessary stuff in your comp (select your main comp and do a File/Reduce Project)
-Comps that are too big
-Comps that have a different framerate from each other.
In your Project window, you can expand its view by hovering your mouse over it and pressing ~ (Tilde) located under the Esc key.
Then sort by Kind.
Open all your folders (yes, even the subfolders), starting at the bottom. Click thru your comps and see their framerate and dimensions in the little thumbnail viewer.
Shows name of comp
Dimensions Wide by Dimensions tall
Duration, framerate
To change the framerate or size, hit Cmd K. Try reducing a massive size by half (in Comp Settings, click the "Lock aspect ratio"

and then at the end of the first number (width) type /2 to divide in half).

Then go into the comp it lived in originally (click the twirly next to the name of comp in Proj window and double the scale value.
Click the scale values in that Timeline, and at the end, hit *2 and AE will do the math.
Brilliant!
File transferring websites
Sometimes you need a FREE alternative to FTP. Or you don't know what FTP is.
If you want to send files smaller than 50MB, use YouSendIt.
Files up to 2GB can be sent via WeTransfer.
A lot of other websites offer these services but have creepy pop-up ads, that make you look unprofessional to clients. Don't use 'em.
If you want to send files smaller than 50MB, use YouSendIt.
Files up to 2GB can be sent via WeTransfer.
A lot of other websites offer these services but have creepy pop-up ads, that make you look unprofessional to clients. Don't use 'em.
Subscribe to:
Posts (Atom)