So some of my Adobe Illustrator-savvy students complain that the "Release to Layers/Sequence" is a pain to use to actually release multiple Illustrator layers to "top-level" layer status. Well, there's an App for that. Ok, not really, but there's a SCRIPT for that.
It works really well! I found it on the Adobe forum:
https://forums.adobe.com/thread/287812
The script is downloadable here.
And then select your top-level layer, break the groups down based on how you want to animate them, then choose "Release to Layers Sequence." Go to File/Scripts/OtherScripts, and navigate to the JET_X_Layers.jsx file.
OMG magic! It pops all your layers to top-layer status, perfect for After Effects! Bangarang!!
Tuesday, October 14, 2014
Wednesday, September 10, 2014
Vimeo compression notes
QT 7: movie to MPEG 4
Settings: H264, 5000kbps, 1280x720, 29.97
Video options: Main, best
Audio tab: AAC-LC, 320 kbps, Stereo, 44.1, Best
480p is 854x480 when it's 16:9, 640x480 when it's 4:3
720p is 1280x720
Settings: H264, 5000kbps, 1280x720, 29.97
Video options: Main, best
Audio tab: AAC-LC, 320 kbps, Stereo, 44.1, Best
480p is 854x480 when it's 16:9, 640x480 when it's 4:3
720p is 1280x720
Tuesday, July 8, 2014
Time-saving tips in AE
http://www.premiumbeat.com/blog/10-time-saving-tips-in-after-effects/
http://www.premiumbeat.com/blog/10-more-time-saving-tips-in-after-effects/
http://www.premiumbeat.com/blog/10-more-time-saving-tips-in-after-effects/
Wednesday, July 2, 2014
Designing a graph?
Fake a graph!
Use http://nces.ed.gov/nceskids/createagraph/default.aspx?ID=f132839312fa483da5701072d851594e
And type in your info. Download a PDF. Design it pretty in AE or Illustrator. And done.
Use http://nces.ed.gov/nceskids/createagraph/default.aspx?ID=f132839312fa483da5701072d851594e
And type in your info. Download a PDF. Design it pretty in AE or Illustrator. And done.
Tuesday, November 12, 2013
MOV to WMV....ugh
Flip4Mac: awful translation of gradients and lights, no custom settings for the Standard edition. Pro (where you can increase the bitrate) is a hefty $160
Aimersoft Video Converter: free edition comes with a watermark. Used a high bitrate but still looks awful.
Wondershare: watermarked, but good quality.
MPG streamclip: uses Flip 4 Mac, awful at default, $160 to upgrade.
MacX Video Converter Free Edition: keeps crashing
MPG converter: won't do larger dimensions
Tune4MAc: fails
WinXMOV converter: crashes
http://video.online-convert.com/convert-to-wmv just as bad as Flip4Mac
PCHand MediaConverterPro: unregistered version converts up to 3 minutes
In conclusion, when you're on a Mac and you have to convert MOV to WMV your best bet is Flip 4 Mac. (Or to kick it old-school and find a Mac with Cleaner installed that always did a nice job for us in ye olde times...)
How to Terminal Render in AE
0. In AE, if you want to render more than 1 window in the Terminal, in AEP render settings, make sure "render multiple frames simultaneously" checkbox is on. If you're going out to ProRes in the end, render 16-bit Tiffs (change in Render Settings) that are set to Trillions (change Millions to Trillions in Output Module window). ProRes is 10-bit so it'll dumb down your 16-bit Tiffs. Set output of these tiffs to a folder on a drive that has TONS of space (can be 40MB per frame)
1. Cmd-space in your Finder
2. type "terminal"
3. open terminal, copy-paste the text: /Applications/Adobe\ After\ Effects\ CS5/aerender -project
(yes, with the space at the end of the line of text, also attached as TextEdit doc)
4. drag-drop your project file from Finder to land at end of text.
5. Then make another Terminal window (Cmd N) and repeat steps 3 & 4.
6. When render is over, import folder as Sequence, set framerate, and output your QT.
Tuesday, May 7, 2013
Color separation in Photoshop
How to separate an image so you can do trippy color-separation effects to it.
Before After


1-Click on your Layer window.
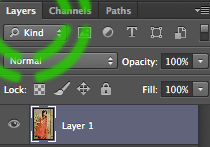
2-Make a new layer, name it Red.

3-Locate the Channels Tab (usually under Layers) or go to Window/Channels to bring it up.
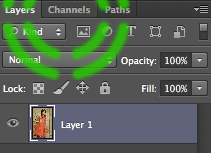

4-In the Channels window, click on Red. The other eyeballs should be off.

5-You’ll see a black-and-white representation of your image. White is where that color is fully present, Black is for absence of that color, grey is for in-between values of semi-Redness.
6-Cmd-click the Red thumbnail to load it as a selection.
7-Back to Layer window.
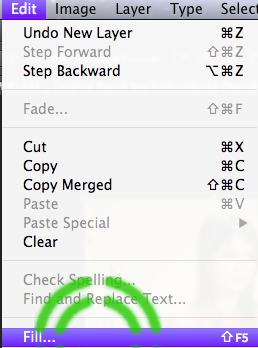
8-Edit/Fill. Use Color, and make red value 255.
9-Red is 255 as below.

10-Turn off eyeball on Red layer.
11-Repeat steps 2-9 for Blue and Green
12-Turn on your Red Green Blue layer eyeballs again. Turn off your original layer eyeball.
Image should look creepy as in the below.


13-Make a new layer, fill it Black. Image continues to look creepy.


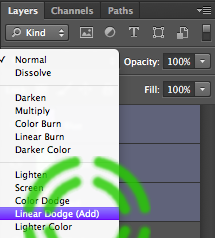
14-Select your color layers. Set their blending mode from Normal to Linear Dodge (Add).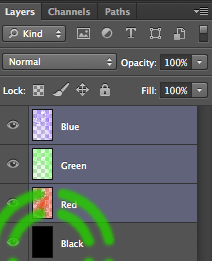
15-Image back to normal...Or is it?
Subscribe to:
Posts (Atom)